Thursday, November 11, 2021

Trees in Winter

Each season brings a different look to the garden. I enjoy each one, but I must say that plants are uniquely beautiful in winter. Now is a great time to see a plant’s texture and form - each unique and mystical.

left to right: Silver maple, red maple/dogwood, & redbud 

Look for the differences between these trees this winter: oak, maple, and redbud. Oaks are the kings of the forest. They soar well above the maples and smaller redbuds. Oaks are majestic in size and texture.

The white and bur oak are most majestic. A white oak will grow well over 100 feet tall in the wild. It has a medium to coarse texture in winter, but the wide-spreading branches exhibit a strong, bold appearance. Bur oaks are a bit more coarse in texture and probably even more majestic with massive trunks and stout branches.

There are many different types of oaks though. A pin oak is much different from the white and bur. Although still medium to coarse textured in winter, a pin oak has a strongly pyramidal habit. It is a strong central leader and pendulous lower branches. My college classmates called this the 55-mile per hour tree because we could recognize it even at highway speeds.

Maples also come in many different shapes and sizes, from the dainty amur maple to the sturdy sugar maple to the weak silver maple. Sugar maples grow 60 to 75 feet tall with a rounded character. They are hard, sturdy trees. Their texture is medium in winter. Notice their beautiful bark, which with age becomes deeply furrowed, with long irregular thick plates or ridges.

Silver maples are very popular because they grow fast. Unfortunately this is not always a good trait, since fast growing trees are usually also weak-wooded, often breaking in wind and ice.

The silver maples grow a bit more oval than rounded and are a bit coarser in the winter, often looking disheveled.

Amur maples and redbuds are similar in that they are both small, understory trees. The amur maple is a small tree or sometimes a multi-stemmed shrub, but is usually round shaped. It has very slender, fine branches and thus a medium-fine texture.

Redbud is a small tree with medium winter texture. Although best known for its spring flowers, it also has interesting bark in winter. The older bark is black or brownish with orange inner bark peeking through.

Enjoy looking at trees this winter. Also notice how terrible the topped trees look! Please do not top trees. It results in very weak, ugly trees!

Originally Published as: Ledger Column 1-8-2000, 1-5-2013; News release 1-8-2018

Wednesday, November 10, 2021

Food Garden Safety Begins with a Lead Test Soil

The garden season is in full force, and I’m excited to hear about all the food and community gardens happening in our area. As we begin growing food and other plants this summer, please consider some potential health hazards.

Forest Hill Community Garden in Peoria, IL
A growing concern in urban soils is lead contamination, though suburban and rural soils may also be contaminated. I recently partnered with the Peoria City/County Health Department to highlight the importance of avoiding lead contaminated soil during the gardening season.

Some garden soil contains high levels of lead that can pose a serious health risk. The risk can be from contaminated garden soil brought into the house on clothing, shoes, tools, or clinging to vegetable crops. Soil becomes mixed with house dust that is inhaled or ingested, resulting in lead poisoning. Roots crops (carrot, radish) are more likely to contain high lead levels than fruiting (tomato, pepper) and leafy (lettuce, spinach) vegetables. The harmful effects of lead poisoning can cause lifelong problems such as learning disabilities, behavioral problems, and lower IQ 

Gardeners can reduce the risk of lead poisoning by following safe gardening recommendations. A good start is with a soil test to determine if the soil is contaminated with harmful lead levels. Garden soils can be contaminated with lead found in old house paint, old lead plumbing pipes, or old leaded automobile fuel. The greatest lead concentration is in the top 1 to 2 inches of soil.

Soil samples should be taken from several areas to determine the location of the contamination. Sample children’s play areas and vegetable gardens separately. With a trowel or shape, take several soil samples from within the chosen area. Combine the samples together, break up clods and mix the f soil thoroughly.

Use about one pint of the soil mixture as a sample to send for testing. Discard the remainder. Send samples to a soil testing lab with a special request for lead testing. Be sure the lab you choose does lead testing.

Gardeners can reduce the risk of lead poisoning from lead contaminated soils by growing food crops in raised beds. Covering ground at the bottom of an eight-inch high raised bed with landscape fabric, then fill with a good potting mix. Avoid using chemical treated lumber.      

More information on how to grow food safely in the home vegetable garden is found on the University of Illinois Extension Lead in Soils Resources website. In addition to a Lead in Garden Soils factsheet, there is also information on soil testing, soil labs, general gardening, other soil contaminants, and more.

Published in Canton Daily Ledger Column on 6-17-2017

Test Yard and Garden Soil Before Adding Amendments

Fall is the time to take soil tests. If you have plants that are not growing the way they should, a soil test might be needed to see if soil amendments are needed.

Fertilize Lawn Based on Soil Test Results

Soil amendments should be based on a soil test to know the amounts needed. Be sure the sample is representative of the area to be treated. The teaspoon of soil finally used for analysis weighs a few grams in comparison to about 50,000 pounds of soil per 1000 square feet to a six-inch depth.

Before sampling the area, size it up for differences in soil characteristics, such as color, texture and drainage. If these features are uniform throughout the area to be treated, a single composite sample of the topsoil is adequate. If there is great variation in these features, take a composite sample from each predetermined area.

Soil samples may be taken at any time of the year when temperature (soil not frozen) and moisture conditions permit. Late summer and fall sampling is a good choice based on factors affecting nutrient availability and time available to the gardener.

Within the area selected for a sample, dig a hole to spade depth. With a shovel or trowel cut a thin slice down one side of the hole. Place this slice in a pail or pan. Do not include sod roots. Repeat this procedure in at least eight well-scattered spots within the chosen area. Place each slice in the pail with those previously taken. Break up clods and mix the slices of soil thoroughly with the hands and by revolving the pail while held at an angle of 45 degrees. Use about one pint of the soil as a sample. Discard the remainder.

The sample is then sent to a soil testing lab. University of Illinois Extension has a listing of labs online at https://web.extension.illinois.edu/soiltest/.

Soil testing and fertilizer application is only one step in effective soil management. For best growth of lawns, vegetables and ornamentals, you should also provide the proper soil structure and soil moisture. Take time this fall to focus on good soil health, because soil management is essential for good plant growth.

Published as News Release on 11-7-2011

Recycled Leaves Make Inexpensive Mulch

Fall brings wiener roasts, festivals, and leaf removal. I suggest making good use of the fallen leaves in your yard.

Ginkgo in Fall
The tree leaves that accumulate in and around your landscape represent a valuable natural resource that can be used to provide a good source of organic matter and nutrients for use in your landscape. Leaves contain 50 to 80 percent of the nutrients a plant extracts from the soil and air during the season. Therefore, leaves should be managed and used rather than bagged or burned. According to Rhonda, there are four basic ways in which leaves can be managed and used in the landscape.

First, a light covering of leaves can be mowed. Simply leave the shredded leaves in place on the lawn. This technique is most effective when a mulching mower is used. In fact, during times of light leaf drop or if there are only a few small trees in your landscape, this technique is probably the most efficient and easiest way to manage leaf accumulation.

Second, mulching is a simple and effective way to recycle leaves and improve your landscape. Leaves can be used as a mulch in vegetable gardens, flower beds and around shrubs and trees. Leaves that have been mowed or run through some other type of shredder will decompose faster and are much more likely to remain in place than complete leaves. I use a chipper shredder vacuum to pick up my leaves, which I use instead of purchased mulch in my landscape beds.

Third, leaves may be collected and worked directly into garden and flowerbed soils. A 6 to 8 inch layer of leaves tilled into a heavy, clay soil will improve aeration and drainage. The same amount tilled into a light, sandy soil, will improve water and nutrient holding capacity. A recommended strategy for using leaves to improve soil in vegetable gardens and annual planting beds is to collect and work them into the soil during the fall. This allows sufficient time for the leaves to decompose prior to spring planting. Adding a little fertilizer to the soil after working in the leaves will hasten their decomposition.

Finally, try composting your leaves. Compost is a dark, crumbly and earth-smelling form of organic matter that has gone through a natural decomposition process. If you have a garden, lawn, trees, shrubs, or even planter boxes or houseplants, you have a use for compost.

Get extra value out of your leaves this fall. And for fun, don’t forget to jump in the pile once!

Watch my video on Fall Leaf Management.

Published as New Release on 10-6-2014

Native Pollinators Are Important for our Food Supply

When it comes to pollination, honeybees get a majority of the attention. However, many insects play a role in pollination. 

Black-Eyed Susan and Purple Coneflower
What is Pollination? Pollination occurs when pollen grains are moved between two flowers of the same species, or within a single flower. There are many ways that flowers are pollinated, including wind and animals.

According to the website pollinator.org about 75% of all flowering plants rely on animal pollinators and over 200,000 species of animals act as pollinators. Of those, about 1,000 are hummingbirds, bats, and small mammals. The rest are insects such as beetles, bees, ants, wasps, butterflies, and moths.

Pollination is critical for many of our food crops. Hundreds of food plants are pollinated by bats. Other pollinators of our most colorful healthy foods include native bees, other insects, birds, moths, and butterflies, and more. Honeybees are not native here but are important pollinators of many of our food crops.

Coreopsis (yellow) and Penstemon (white)
The Xerces society has great information about pollinators on their website at www.xerces.org, including how to attract them to your garden. The usual recommendation is to plant a diversity of native flowers.

Wild Geranium
The goal is to have something flowering all summer long. Examples in my yard include wild indigo and wild geranium that bloom in early spring, followed by penstemon and coreopsis in early summer. By mid-summer the black-eyed Susan’s and purple coneflowers are in full bloom. In the fall, asters and goldenrod make a show.

Typically, native plants require less care and can tolerate more of our weather extremes. However, I’ve found that some routine maintenance does help the garden perform better. This year I’ve tried very hard to deadhead individual flowers, which prolongs the blooming of many perennial plants. I’ve also cut some back when they are done flowering, which in many cases helps the plant foliage look more attractive for a longer period.

Try adding native pollinator plants to your gardens.

Originally Published in Canton Daily  Ledger Column on 8-13-16 

Tuesday, November 9, 2021

Moss…Friend or Foe

On a recent (June 2012) camping trip in Southern Illinois my husband Mark kept taking pictures of non-flowering plants. His pictures made the ferns, mosses, lichens, and club moss look like something right out of a fairytale. In fact, these non-flowering plants do have their very own kingdom in the plant world. Instead of reproducing by flowers and seeds, these plants use spores to multiply. We were all particularly amazed by the various mosses.  


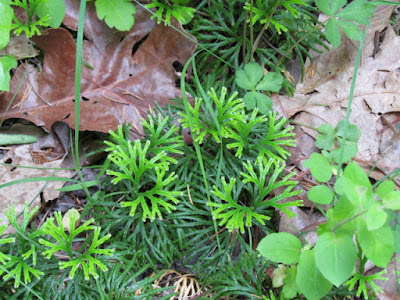
While hiking I discovered a large patch of club moss. I had never seen it before. Club mosses are ancient, prehistoric plants that reproduce by means of spores, either clustered into small cones or in the axils of their scale like leaves. I suspect that the one I saw was a ground pine because it resembled miniature evergreens with flattened fan-shaped branches. For a plant-geek like me this was an amazing find!

Club Moss

There are more than 13,000 species of mosses, which are small, primitive, leafy, green plants that develop fine, tangled mats over a surface. Various species are often seen on old brick walls, stone paths or walls, roofs, and rocks. Moss is something that we seem to love or hate. Many people try to get rid of it in their lawns, while others try to grow it.

In the right place, I love the look of moss. It is natural and in the right combination with wildflowers and other native plants helps create a stunning landscape. Psychologically, moss has a soothing, relaxing effect on people. It is a natural component of woodlands and shade gardens.

Mosses grow where other plants won’t, preferring low soil fertility, poor soil drainage, compacted soils, excessive shade, poor air circulation, high humidity, or a combination of these conditions. Mosses are not always found in low pH soils, thus altering the soil pH may not eliminate mosses. In turf, mosses are not the cause of turf decline, but a symptom of environmental or management levels that are unsuitable for supporting quality turf.

For areas where you do not want the moss, it can be eliminated, at least temporarily, by hand raking when it first appears or by applying ferrous ammonium sulfate or ferric sulfate.  Remember, however, that moss will probably reappear unless the environment and/or turf management program is altered.

For areas where you do want moss, the basic requirements are shade; compact, bare, acid soil; and moisture. The best time for transplanting is in early spring. Once established, moss is a tough plant. It is hardy from zones 2 to 9 and able to survive severe drought.

Although we often try to control and manipulate Mother Nature, sometimes “she” really knows best. Although I do not believe in gardening exclusively with natives, I believe native habitats tell us an awful lot. Sometimes it is worth considering “giving in” to situations where a certain plant wants to grow. Moss is a good example. It is a good alternative to grass in shady areas and in the right location can be used very effectively.

Originally Published in Canton Daily Ledger Column on 6-2-2012

Don't Raise Mosquitoes in Your Yard

While doing your spring cleanup activities, be sure to look for mosquito breeding sites in your yard. The first step to fighting mosquitoes MUST begin in YOUR backyard.

West Nile Virus is most frequently transmitted through the house mosquito. Since it can only fly about 1-½ miles, this mosquito usually breeds and lives in our own backyards. After getting an adequate blood meal, the adult female mosquito lays her eggs in any stagnant water source. The eggs and larvae must have water to live. Therefore, we must remove as many water sources as possible from our yards and communities.

The water source does not have to be large. In fact, the house mosquito prefers small, nasty water pools. It can breed in water sources as small as an 8-ounce glass.

Keep birdbaths clean
Here are common areas in our yards that often hold enough water to breed mosquitoes: dirty gutters, flat roofs, tin cans, buckets, brake drums, bottles, candy wrappers, and trash. Most people know to eliminate tires, which are the Crown Plaza of breeding sites. Also, remember to keep swimming pools clean and dump water in tarps and other covers. Keep birdbaths clean and fresh.

For the gardener, remember to dump any water standing in containers or drip trays. Garden ponds should contain fountains or other features to keep the water moving or include top-feeding fish that will eat any mosquito larvae that try to develop.  Examples of top-feeding fish include Gambusia, known as mosquito fish, most bait minnows, guppies, or even goldfish. Koi are not recommended since they are vegetarians.

It’s hard to predict insect populations year to year.  Spring populations are easy to get a handle on due to winter conditions, but spring conditions have an effect on summer populations, summer weather affects fall insects, and so forth.   You really can’t predict problems for more than one season in a row.

Eliminating breeding sites can reduce mosquito problems in your yard.  This is key to any type of mosquito control program.  Fortunately, an ongoing program of eliminating these sites in your yard is easy and not time-consuming.  However, it must be done regularly – at least once per week since it takes mosquito larvae 5-7 days to develop.

For areas where the water cannot be eliminated, there are other options for controlling the larvae.

Originally Published in Ledger Column on 4-12-2003