Saturday, November 20, 2021

Earthworms ...Not just good fish bait

One of my fondest childhood memories is dew-worming with my Dad (Ron Simmons). We’d go out at dusk with a red lighted flashlight, sometimes after Dad had watered an area earlier in the day. I don’t remember ever buying worms; we just “harvested” them ourselves. Even as a child I learned the best way to grab a worm without breaking it before it escaped back into its earthly home.

Dad and me fishing on Anderson Lake

Most people know that earthworms (also called night crawlers) are very beneficial for our soil. They daily consume their weight as they grind large organic materials into smaller ones. The University of Illinois Extension Herman the Worm website) calls the earthworm “one of nature’s top soil scientists.”

Worms benefit the soil in many ways. The add air and water, which produces a perfect growing environmental for most plants. They essentially “turn” the soil as they bring organic matter down and mix it with the soil below. When they eat, they leave behind castings that area very valuable type of fertilizer. The equivalent of about one third pound of top-grade fertilizer is produced per worm each year. As the website says, “Having worms around in your garden is a real good sign that you have a healthy soil.”

A fact about earthworms that most people don’t know is that they are not native to North America. Early European settlers brought them here during the 1600’s and 1700’s. They tagged along in the soil of plants brought from their country. Fortunately, this foreign critter has proved to be mostly beneficial.

Here are some other interesting facts about worms. In one acre of land, there can be more than a million earthworms. The slimy excretion of earthworms contains nitrogen, which is required for plant growth. Baby worms hatch from cocoons smaller than a grain of rice. Worms don’t have eyes, but they can sense light (which is why Dad and I covered our flashlights with clear red covering). The number of rings or segments of the body is species dependent: the common earthworm has about 150 segments while the red worm has about 95.

Obviously, worms are an important component in any composting process. An increasingly popular form of worm composting –vermiculture –uses worms to turn kitchen scraps into compost. It is easy and cheap. This process uses a red worm, not the larger earthworms. Take a plastic bin with holes drilled in it, newspaper, soil, worms, and fruit or vegetable peelings and you’ll soon have “black gold” to use in houseplants or outside.

So, the next time you thread a worm onto a fishing hook, remember that they are much more than fish bait. Good luck fishing and Happy Father’s Day!

Published in Canton Daily Ledger Column on 6-15-2013

NOTE: Since this article was written, the invasive jumping worm has been found in Illinois. View this Invasive Species Alert: Jumping Worms for more information. 


Thursday, November 11, 2021

The Bald Eagle

Today (2-2-2002) is Eagle Days in Havana. Numerous eagles spend their winters right here in central Illinois. Many can be easily seen from Riverfront Park in Havana. If you’ve never seen a Bald Eagle in the wild, I encourage you to take a drive to Havana this morning.

On January 13, the Champaign County Audubon Society did its annual Eagle Count along the Illinois River from Havana to Beardstown.  They counted 206 Bald Eagles (95 adult, 111 immature) and one adult Golden Eagle.  The Golden Eagle was at Emiquon refuge across the river from Havana.  There were also lots of Bald Eagles at Lake Chautauqua, just north of Havana, where there were also thousands of Canada Geese, many Snow Geese, and 21 Swans.

My family has really enjoyed watching Bald Eagles this winter. I find this really awesome especially knowing that the eagles came very close to extinction. The story of the Bald Eagle comeback includes an important lesson for us all. 

The Bald Eagle was originally classified as endangered in 1967. Shortly after World War II, the use of chemicals such as DDT and other related compounds (including Chlordane) became widespread. These chemicals last a long time in our environment and started to accumulate in Bald Eagles due to their natural feeding habits. The DDT impaired the eagles’ eggs, resulting in thin eggshells and reproductive failures. Since that time, the US-EPA has banned such chemicals and conservation and breeding efforts have brought our national bird populations back.

I tell you this because I think it is a great story of how humans can fix a problem we created. Think of this story each time you use a pesticide. Pesticides are anything used to control a pest and include insecticides, herbicides, fungicides, etc. Almost all of us use them. When you grab the ant killer under the kitchen sink, you are using a pesticide.

To assure you apply pesticides in a safe and effective way that will obtain the control you want and still protect your family and our environment, you simply need to read the label. Reading the label is extremely important and it is the law! Labels change frequently, so you need to reread them each time you use the product. Carefully follow all directions on that pesticide label.

Whether you use pesticides or not is a personal decision, but if you do use them with respect and READ THE LABEL!

Published in Canton Daily Ledger Column on 2-20-1999, 2-2-2002, 2-1-2003, 2-5-2005

Worm Composting

Composting is not just an outdoor activity. It can also be done indoors to get rid of those food scraps in your kitchen.


Worm composting involves using worms to turn food scraps, newspapers, and cardboard into a rich compost, which can be added to potted plants, lawns and gardens. It is convenient, and you can do it indoors (even in apartments) or outdoors.

Don’t worry! When done correctly, worm composting will not cause an odor or have worms crawling all over your house. The worms are quite small, but could still be used for fishing.

Worm composting (or vermicomposting) is one of the easiest methods for reusing fruit and vegetable scraps from your kitchen and yard. All you need is a container filled with moistened bedding, worms, and food scraps.

Even in cool winter weather, where outdoor compost piles lie dormant, you can compost your food scraps indoors with worms and reduce the volume of your household garbage by as much as 25%. The end result is unsurpassed as an organic soil builder and plant fertilizer, containing high amounts of nitrogen.

Worm composting is easy, rewarding, and fun! Given the right environment and a little routine attention, a handful of worms will multiply rapidly and digest your kitchen scraps.

Worm composting is a great way to recycle food scraps indoors all year long. 

To learn more about vermicomposting make sure to read Oregon State University Extension’s “Composting with Worms"

Published in Canton Daily Ledger Column 1-28-2006


New Plant Hardiness Zone Map in 2012

This has certainly been an unusually warm winter so far. Many people are concerned that the warm temperatures will results in plants sprouting too soon or in heavy summer insect problems.

Some people wonder if our climate is changing due to various factors, including global warming.

Source: Illinois State Climatologist  

The USDA released their new Plant Hardiness Zone map recently. The 2012 changes show that we are indeed experiencing overall warmer winter temperatures.

The USDA hardiness zones are based on average winter minimum temperatures. According to Jim Angel, Illinois State Climatologist at the Illinois State Water Survey, “This is certainly an improvement on the old USDA map that was based on data from a relatively short and cold period from 1974 to 1986.” Angel says that the new map is based on a longer period that includes the milder winters of the 1990s and early 2000s.

The new map can be found at http://planthardiness.ars.usda.gov.

To reflect these milder winters, most zones have shifted northward. Angel says, “Here in Champaign I used to be in the middle of Zone 5 according to the old USDA map. Now I'm almost in Zone 6.”

These maps are a useful guide. Most garden catalogs list the hardiness zone rating for their plants. The hardiness zone is an important plant selection guide, but it is only one factor in determining if a plant will survive the winter. Other factors, such as moisture levels and critters (voles, rabbits, and mice), also affect a plants chance of winter survival.

Speaking of critters, will this mild winter affect insect populations this summer? According to Phil Nixon, Extension Entomologist, mild winters or cold winters have little effect on the number of insects that people typically notice.

Nixon says that it is true that in a mild winter, more pest insects survive, but so do more predatory insects, parasitic insects, and other natural enemies. Contrary to popular belief, Nixon says that the most important impact on insect numbers is spring weather. Cool, damp springs encourage the development of fungi that attack insects and slow the development of insects. The result is fewer caterpillars and other insects surviving through the spring.

And finally, if you have daffodils sprouting or plants leafing out early, don’t fret. Although some of the early growth could experience freeze damage later, the plants should be fine overall once our official spring finally arrives. You can add a layer of mulch over the sprouting plants to provide additional winter protection, but it is probably not essential.

Published in Canton Daily Ledger Column 2-4-2012

Removing Tree Stumps

Recent droughty summers, a cold winter, and various other environmental and pest problems have killed many trees in our area. Usually when a tree is removed a stump is left behind. Here are several suggestions on how to remove tree stumps easily, quickly, and economically.

According to Bob Frazee, retired University of Illinois Natural Resources Educator, the cheapest and easiest method of removal, although not the quickest, is to cut the stump at or below the ground level, cover it with soil, and keep the soil moist. Decay organisms will then rot the wood. Grass may be planted in the soil if the thin layer over the stump is kept moist during dry seasons. The decaying method may be hastened by boring several vertical holes in the stump before it is covered with soil. This method may be used any time during the year. 

Frazee says that stumps may also be burned out. However, before burning stumps, be sure to check your local ordinances to see whether open burning is permitted. Frazee suggests that stumps may be burned out rather quickly with charcoal or coal by making a “stove” from an empty 5-gallon metal container. A stove is made by removing the bottom and top from the can and punching 4 to 5 one-inch holes in the side near the bottom. Place the stove on top of the stump and build a fire in it. A hot fire is required to burn out stumps, since the wood absorbs moisture from the soil and burns like green wood. Stumps will burn best during dry seasons.

Grubbing or digging out stumps is another option, according to Frazee, but it is hard work. Stumps larger than 15 inches in diameter are usually rather difficult for the average person to remove.

A popular option for homeowners to explore is use of a commercial stump grinder. Mechanical stump grinders that chip the wood are available from some landscaping firms, tree removal services, and some community street departments. A stump-cutting or grinding machine is often the quickest and most satisfactory means of removal. It can chip out a stump to 8 or 12 inches below ground level in minutes.

Stump removal is not easy. Many people resolve to leave the stump and let it decay naturally. Chemicals are available that can help speed up the decomposition process. Instructions for stump removal chemicals will vary from product to product, but all require drilling several holes in the stump. A measured amount of chemical is poured in each hole, and then water is added to fill the holes. Let the mixture stand for four to six weeks. Repeat applications may be necessary.

Sometimes the decaying stump is included in the landscaping. I saw a stump used as a miniature fairy garden recently that was really cute. Try adding containers on top of the stump for a different look. I once put a wooden wheelbarrow filled with annual flowers on a stump and added more annual flowers around the stump. Use your imagination and you may find leaving the stump is a good option.

If the tree is not completely dead when it is cut down the stump may produce sucker growth. You have two options to solve this problem. The quickest solution is to immediately treat the cut surface with an herbicide. You can also cut off all new sucker growth before it reaches eight inches to gradually deplete the stored food, but this can take five to ten years to be completely effective.

Finally, remember that dead trees are an important part of our ecosystem. Many birds and small mammals nest in dead trees. Consider leaving the tree if it is located in an area where it won’t be an eyesore or cause safety issues over time.

Originally Published in Canton Daily Ledger Column 6-21-2014; News Release 6-24-2013

Sticky Plants are Annoying

While hiking recently I got to thinking about the various plants that stick to our sock and pants. Certainly, they are frustrating; but, as a plant geek, I wanted to know more.

Sticky plants attaching to clothes, hair, fur, and feathers to disperse their seeds into new areas. They do this with hooks, spines, barbs, and burrs. Let’s look at a few common examples that we find here in central Illinois.

The biggest challenge on my property is Spanish Needles (Bidens bipinnata). This weedy plant grows one to three foot tall in dry, shady areas. Its leaves are finely textured, looking a bit like flat-leaved parsley. The non-showy, yellow flowers develop into 2-4 prong, barbed fruit. They get their name from the fruit’s needle-like prongs, each with its own backward pointing barb.

Virginia Stickseed
Virginia Stickseed (Hackelia virginiana), also called beggar’s lice, has very small prickly bur fruit that clings to clothing. It grows one to four foot tall in dry woods. The burs are less than ¼” in size. Burs are arranged along one side of stems (racemes) that are held 2-8” above the plant.

Probably the most commonly known hitchhikers are burdock and cocklebur. In fact, Velcro is said to have been designed after the burs of the burdock plant. After a hunting trip, the inventor looked closer at the tiny hooks on the bur and created the hook and loop fasteners design.

Cocklebur
Burdock (Arctium sp.) is a robust plant. It is also called wild rhubarb due to its large leaves that can reach 20” long. This is a biennial plant that grows rhubarb-like leaves the first year. In the second year, it sends up 2-5 foot stalk with large egg-shaped leaves and ½ to 1” bristly purple flowers. Each fruit is a prickly, clinging bur. Unlike rhubarb whose stems are edible, burdock has an edible taproot.

Cocklebur (Xanthium sp.) is related to burdock. This plant sprouts from seed each year, reaching 2-5 foot by summer’s end. Its triangular, lobed leaves are 2-6” long. Cocklebur has both male and female green colored flowers. Female flowers form ½-3/4” burs that are held in the axils of the leaves. The football-shaped burs cling with hook-tipped prickles.

Bedstraw

Bedstraw (Gallium sp.) is sometimes called velcro-plant or stickywilly. Bedstraw attached to us in two ways. Its leaves and stems have fine hook-like hairs that cling to clothing and fur. However, it is the extremely small seeds that really create havoc. At less than 1/25 of an inch, the seed burs are covered with small hooked bristles. Because each plant produces hundreds of seeds, they quickly cover large areas of clothing. Their small size and abundance make them difficult to remove.

There are many more, but you get the idea. I have not developed a magic way for removing these from my clothes or pet’s hair. Washing clothes does not remove most hitchhiker seeds. They usually need to be picked off individually, though some can be scraped off with a butter knife.

Enjoy a fall hike in the woods, but try to avoid those hitchhikers!

Published in Canton Daily Ledger Column 11-4-2017

Trees in Winter

Each season brings a different look to the garden. I enjoy each one, but I must say that plants are uniquely beautiful in winter. Now is a great time to see a plant’s texture and form - each unique and mystical.

left to right: Silver maple, red maple/dogwood, & redbud 

Look for the differences between these trees this winter: oak, maple, and redbud. Oaks are the kings of the forest. They soar well above the maples and smaller redbuds. Oaks are majestic in size and texture.

The white and bur oak are most majestic. A white oak will grow well over 100 feet tall in the wild. It has a medium to coarse texture in winter, but the wide-spreading branches exhibit a strong, bold appearance. Bur oaks are a bit more coarse in texture and probably even more majestic with massive trunks and stout branches.

There are many different types of oaks though. A pin oak is much different from the white and bur. Although still medium to coarse textured in winter, a pin oak has a strongly pyramidal habit. It is a strong central leader and pendulous lower branches. My college classmates called this the 55-mile per hour tree because we could recognize it even at highway speeds.

Maples also come in many different shapes and sizes, from the dainty amur maple to the sturdy sugar maple to the weak silver maple. Sugar maples grow 60 to 75 feet tall with a rounded character. They are hard, sturdy trees. Their texture is medium in winter. Notice their beautiful bark, which with age becomes deeply furrowed, with long irregular thick plates or ridges.

Silver maples are very popular because they grow fast. Unfortunately this is not always a good trait, since fast growing trees are usually also weak-wooded, often breaking in wind and ice.

The silver maples grow a bit more oval than rounded and are a bit coarser in the winter, often looking disheveled.

Amur maples and redbuds are similar in that they are both small, understory trees. The amur maple is a small tree or sometimes a multi-stemmed shrub, but is usually round shaped. It has very slender, fine branches and thus a medium-fine texture.

Redbud is a small tree with medium winter texture. Although best known for its spring flowers, it also has interesting bark in winter. The older bark is black or brownish with orange inner bark peeking through.

Enjoy looking at trees this winter. Also notice how terrible the topped trees look! Please do not top trees. It results in very weak, ugly trees!

Originally Published as: Ledger Column 1-8-2000, 1-5-2013; News release 1-8-2018

Wednesday, November 10, 2021

Food Garden Safety Begins with a Lead Test Soil

The garden season is in full force, and I’m excited to hear about all the food and community gardens happening in our area. As we begin growing food and other plants this summer, please consider some potential health hazards.

Forest Hill Community Garden in Peoria, IL
A growing concern in urban soils is lead contamination, though suburban and rural soils may also be contaminated. I recently partnered with the Peoria City/County Health Department to highlight the importance of avoiding lead contaminated soil during the gardening season.

Some garden soil contains high levels of lead that can pose a serious health risk. The risk can be from contaminated garden soil brought into the house on clothing, shoes, tools, or clinging to vegetable crops. Soil becomes mixed with house dust that is inhaled or ingested, resulting in lead poisoning. Roots crops (carrot, radish) are more likely to contain high lead levels than fruiting (tomato, pepper) and leafy (lettuce, spinach) vegetables. The harmful effects of lead poisoning can cause lifelong problems such as learning disabilities, behavioral problems, and lower IQ 

Gardeners can reduce the risk of lead poisoning by following safe gardening recommendations. A good start is with a soil test to determine if the soil is contaminated with harmful lead levels. Garden soils can be contaminated with lead found in old house paint, old lead plumbing pipes, or old leaded automobile fuel. The greatest lead concentration is in the top 1 to 2 inches of soil.

Soil samples should be taken from several areas to determine the location of the contamination. Sample children’s play areas and vegetable gardens separately. With a trowel or shape, take several soil samples from within the chosen area. Combine the samples together, break up clods and mix the f soil thoroughly.

Use about one pint of the soil mixture as a sample to send for testing. Discard the remainder. Send samples to a soil testing lab with a special request for lead testing. Be sure the lab you choose does lead testing.

Gardeners can reduce the risk of lead poisoning from lead contaminated soils by growing food crops in raised beds. Covering ground at the bottom of an eight-inch high raised bed with landscape fabric, then fill with a good potting mix. Avoid using chemical treated lumber.      

More information on how to grow food safely in the home vegetable garden is found on the University of Illinois Extension Lead in Soils Resources website. In addition to a Lead in Garden Soils factsheet, there is also information on soil testing, soil labs, general gardening, other soil contaminants, and more.

Published in Canton Daily Ledger Column on 6-17-2017

Test Yard and Garden Soil Before Adding Amendments

Fall is the time to take soil tests. If you have plants that are not growing the way they should, a soil test might be needed to see if soil amendments are needed.

Fertilize Lawn Based on Soil Test Results

Soil amendments should be based on a soil test to know the amounts needed. Be sure the sample is representative of the area to be treated. The teaspoon of soil finally used for analysis weighs a few grams in comparison to about 50,000 pounds of soil per 1000 square feet to a six-inch depth.

Before sampling the area, size it up for differences in soil characteristics, such as color, texture and drainage. If these features are uniform throughout the area to be treated, a single composite sample of the topsoil is adequate. If there is great variation in these features, take a composite sample from each predetermined area.

Soil samples may be taken at any time of the year when temperature (soil not frozen) and moisture conditions permit. Late summer and fall sampling is a good choice based on factors affecting nutrient availability and time available to the gardener.

Within the area selected for a sample, dig a hole to spade depth. With a shovel or trowel cut a thin slice down one side of the hole. Place this slice in a pail or pan. Do not include sod roots. Repeat this procedure in at least eight well-scattered spots within the chosen area. Place each slice in the pail with those previously taken. Break up clods and mix the slices of soil thoroughly with the hands and by revolving the pail while held at an angle of 45 degrees. Use about one pint of the soil as a sample. Discard the remainder.

The sample is then sent to a soil testing lab. University of Illinois Extension has a listing of labs online at https://web.extension.illinois.edu/soiltest/.

Soil testing and fertilizer application is only one step in effective soil management. For best growth of lawns, vegetables and ornamentals, you should also provide the proper soil structure and soil moisture. Take time this fall to focus on good soil health, because soil management is essential for good plant growth.

Published as News Release on 11-7-2011

Recycled Leaves Make Inexpensive Mulch

Fall brings wiener roasts, festivals, and leaf removal. I suggest making good use of the fallen leaves in your yard.

Ginkgo in Fall
The tree leaves that accumulate in and around your landscape represent a valuable natural resource that can be used to provide a good source of organic matter and nutrients for use in your landscape. Leaves contain 50 to 80 percent of the nutrients a plant extracts from the soil and air during the season. Therefore, leaves should be managed and used rather than bagged or burned. According to Rhonda, there are four basic ways in which leaves can be managed and used in the landscape.

First, a light covering of leaves can be mowed. Simply leave the shredded leaves in place on the lawn. This technique is most effective when a mulching mower is used. In fact, during times of light leaf drop or if there are only a few small trees in your landscape, this technique is probably the most efficient and easiest way to manage leaf accumulation.

Second, mulching is a simple and effective way to recycle leaves and improve your landscape. Leaves can be used as a mulch in vegetable gardens, flower beds and around shrubs and trees. Leaves that have been mowed or run through some other type of shredder will decompose faster and are much more likely to remain in place than complete leaves. I use a chipper shredder vacuum to pick up my leaves, which I use instead of purchased mulch in my landscape beds.

Third, leaves may be collected and worked directly into garden and flowerbed soils. A 6 to 8 inch layer of leaves tilled into a heavy, clay soil will improve aeration and drainage. The same amount tilled into a light, sandy soil, will improve water and nutrient holding capacity. A recommended strategy for using leaves to improve soil in vegetable gardens and annual planting beds is to collect and work them into the soil during the fall. This allows sufficient time for the leaves to decompose prior to spring planting. Adding a little fertilizer to the soil after working in the leaves will hasten their decomposition.

Finally, try composting your leaves. Compost is a dark, crumbly and earth-smelling form of organic matter that has gone through a natural decomposition process. If you have a garden, lawn, trees, shrubs, or even planter boxes or houseplants, you have a use for compost.

Get extra value out of your leaves this fall. And for fun, don’t forget to jump in the pile once!

Watch my video on Fall Leaf Management.

Published as New Release on 10-6-2014

Native Pollinators Are Important for our Food Supply

When it comes to pollination, honeybees get a majority of the attention. However, many insects play a role in pollination. 

Black-Eyed Susan and Purple Coneflower
What is Pollination? Pollination occurs when pollen grains are moved between two flowers of the same species, or within a single flower. There are many ways that flowers are pollinated, including wind and animals.

According to the website pollinator.org about 75% of all flowering plants rely on animal pollinators and over 200,000 species of animals act as pollinators. Of those, about 1,000 are hummingbirds, bats, and small mammals. The rest are insects such as beetles, bees, ants, wasps, butterflies, and moths.

Pollination is critical for many of our food crops. Hundreds of food plants are pollinated by bats. Other pollinators of our most colorful healthy foods include native bees, other insects, birds, moths, and butterflies, and more. Honeybees are not native here but are important pollinators of many of our food crops.

Coreopsis (yellow) and Penstemon (white)
The Xerces society has great information about pollinators on their website at www.xerces.org, including how to attract them to your garden. The usual recommendation is to plant a diversity of native flowers.

Wild Geranium
The goal is to have something flowering all summer long. Examples in my yard include wild indigo and wild geranium that bloom in early spring, followed by penstemon and coreopsis in early summer. By mid-summer the black-eyed Susan’s and purple coneflowers are in full bloom. In the fall, asters and goldenrod make a show.

Typically, native plants require less care and can tolerate more of our weather extremes. However, I’ve found that some routine maintenance does help the garden perform better. This year I’ve tried very hard to deadhead individual flowers, which prolongs the blooming of many perennial plants. I’ve also cut some back when they are done flowering, which in many cases helps the plant foliage look more attractive for a longer period.

Try adding native pollinator plants to your gardens.

Originally Published in Canton Daily  Ledger Column on 8-13-16 

Tuesday, November 9, 2021

Moss…Friend or Foe

On a recent (June 2012) camping trip in Southern Illinois my husband Mark kept taking pictures of non-flowering plants. His pictures made the ferns, mosses, lichens, and club moss look like something right out of a fairytale. In fact, these non-flowering plants do have their very own kingdom in the plant world. Instead of reproducing by flowers and seeds, these plants use spores to multiply. We were all particularly amazed by the various mosses.  


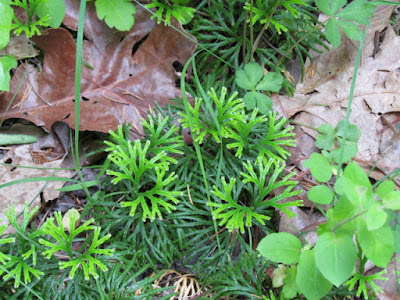
While hiking I discovered a large patch of club moss. I had never seen it before. Club mosses are ancient, prehistoric plants that reproduce by means of spores, either clustered into small cones or in the axils of their scale like leaves. I suspect that the one I saw was a ground pine because it resembled miniature evergreens with flattened fan-shaped branches. For a plant-geek like me this was an amazing find!

Club Moss

There are more than 13,000 species of mosses, which are small, primitive, leafy, green plants that develop fine, tangled mats over a surface. Various species are often seen on old brick walls, stone paths or walls, roofs, and rocks. Moss is something that we seem to love or hate. Many people try to get rid of it in their lawns, while others try to grow it.

In the right place, I love the look of moss. It is natural and in the right combination with wildflowers and other native plants helps create a stunning landscape. Psychologically, moss has a soothing, relaxing effect on people. It is a natural component of woodlands and shade gardens.

Mosses grow where other plants won’t, preferring low soil fertility, poor soil drainage, compacted soils, excessive shade, poor air circulation, high humidity, or a combination of these conditions. Mosses are not always found in low pH soils, thus altering the soil pH may not eliminate mosses. In turf, mosses are not the cause of turf decline, but a symptom of environmental or management levels that are unsuitable for supporting quality turf.

For areas where you do not want the moss, it can be eliminated, at least temporarily, by hand raking when it first appears or by applying ferrous ammonium sulfate or ferric sulfate.  Remember, however, that moss will probably reappear unless the environment and/or turf management program is altered.

For areas where you do want moss, the basic requirements are shade; compact, bare, acid soil; and moisture. The best time for transplanting is in early spring. Once established, moss is a tough plant. It is hardy from zones 2 to 9 and able to survive severe drought.

Although we often try to control and manipulate Mother Nature, sometimes “she” really knows best. Although I do not believe in gardening exclusively with natives, I believe native habitats tell us an awful lot. Sometimes it is worth considering “giving in” to situations where a certain plant wants to grow. Moss is a good example. It is a good alternative to grass in shady areas and in the right location can be used very effectively.

Originally Published in Canton Daily Ledger Column on 6-2-2012

Don't Raise Mosquitoes in Your Yard

While doing your spring cleanup activities, be sure to look for mosquito breeding sites in your yard. The first step to fighting mosquitoes MUST begin in YOUR backyard.

West Nile Virus is most frequently transmitted through the house mosquito. Since it can only fly about 1-½ miles, this mosquito usually breeds and lives in our own backyards. After getting an adequate blood meal, the adult female mosquito lays her eggs in any stagnant water source. The eggs and larvae must have water to live. Therefore, we must remove as many water sources as possible from our yards and communities.

The water source does not have to be large. In fact, the house mosquito prefers small, nasty water pools. It can breed in water sources as small as an 8-ounce glass.

Keep birdbaths clean
Here are common areas in our yards that often hold enough water to breed mosquitoes: dirty gutters, flat roofs, tin cans, buckets, brake drums, bottles, candy wrappers, and trash. Most people know to eliminate tires, which are the Crown Plaza of breeding sites. Also, remember to keep swimming pools clean and dump water in tarps and other covers. Keep birdbaths clean and fresh.

For the gardener, remember to dump any water standing in containers or drip trays. Garden ponds should contain fountains or other features to keep the water moving or include top-feeding fish that will eat any mosquito larvae that try to develop.  Examples of top-feeding fish include Gambusia, known as mosquito fish, most bait minnows, guppies, or even goldfish. Koi are not recommended since they are vegetarians.

It’s hard to predict insect populations year to year.  Spring populations are easy to get a handle on due to winter conditions, but spring conditions have an effect on summer populations, summer weather affects fall insects, and so forth.   You really can’t predict problems for more than one season in a row.

Eliminating breeding sites can reduce mosquito problems in your yard.  This is key to any type of mosquito control program.  Fortunately, an ongoing program of eliminating these sites in your yard is easy and not time-consuming.  However, it must be done regularly – at least once per week since it takes mosquito larvae 5-7 days to develop.

For areas where the water cannot be eliminated, there are other options for controlling the larvae.

Originally Published in Ledger Column on 4-12-2003

Monday, November 8, 2021

Mosquito-eating Fish Another Weapon In Mosquito War

Last weekend (May 2003) we bought fish to add to our new pond. For now, we have mostly goldfish, except for one mosquito fish. We might add a koi later.


My new pond is quite large and when done will have a complete aquatic ecosystem of plants, water, and fish. It also has a small waterfall in one corner. The movement from the waterfall should be enough to keep mama mosquito from laying her eggs there, but if she does the fish will eat them!


Fish are excellent weapons in the fight against mosquitoes. The artillery includes minnows, goldfish and Gambusia affinis, also known as "mosquito fish.”  One small mosquito fish can eat up to 100 mosquito larvae each day.  They can make a big difference in a home’s water garden or small pond.


Mosquitoes go through their larval stage in water, whether it is a lake, river, water garden, gutter or birdbath.  Any container that holds water, and especially water that stagnates, is a prime breeding ground for mosquitoes.


Gambusia are related to and look very much like guppies. The males are cigar-shaped and are about an inch long. Female Gambusia are slightly larger and typically have a potbelly where they carry their developing young.  Gambusia are aggressive, eating young game and other fish.  They should not be released where they can escape into natural bodies of water. Introducing these fish to a new area carries some risk of introducing new diseases to existing fish.


Gambusia aren’t the only fish that eat mosquitoes.  Other surface feeding fish such as goldfish and minnows work well in controlling mosquito larva.  Koi, which tend to be bottom feeders, are not effective in controlling mosquito larva.


But none of these fish are effective at eliminating mosquito larvae when dense vegetation is present.  Dense vegetation can provide cover for mosquito larvae and make it difficult for fish to locate and consume them.  Reducing excess vegetation in and around the water garden is recommended.


Increasing water movement in ponds and water gardens, and eliminating standing water in old tires, gutters, and other water-holding containers are two strong tools in eliminating mosquito-breeding sites. 

Originally Published in Canton Daily Ledger Column on 5-17-2003

Lightning Bugs on the Decline

I hear a news report about the decline of the monarch butterfly almost every day, but there are other insects in decline as well. One that is a favorite of all ages is the lightning bug, which some folks also call a firefly.

As a kid I remember catching lightning bugs on warm, summer nights. We put them in empty canning jars or pickle jars, poked holes in the lids, and watched the bugs glow in our new natural lantern. Although I hate to admit it, I also sometimes ripped off the abdomen of the bug to make a glowing ring on my finger.

Source:   Whitney Cranshaw,
Colorado State University
Bugwood.org

Lightning bugs flash light to attract the opposite sex using a chemical called luciferase. There are over 136 species of lightning bugs, each with a distinctive rate of flashes per second. Male lightning bugs flash patterns of light to females who then signal in response from perches in or near the ground. When the male sees the female's flash he continues to signal and moves closer until they finally find each other and mate.

Lightning bugs are actually a type of beetle that is very beneficial in our ecosystem. The larvae stage of this beetle is a specialized predator that feeds on other insect larvae, earthworms, snails, and slugs. The tiny larval stage is dark gray with three pairs of legs and tiny spots on their underside that sometimes softly glow.  Some adult lightning bug species are also predators, and other species don’t eat at all in the adult stage. 

Large swarms of lightning bugs are a less frequent occurrence in many areas. I can remember a midnight float down the Illinois River a few years ago when the river bank was alive with millions of flashing fireflies. This summer I saw lightning bugs, but not in large numbers. They are most prevalent away from city lights and in more open areas of vegetation.

According to www.firefly.org firefly populations are dwindling all over the country, and the world. Researchers are not sure exactly what is causing the firefly decline, although most researchers think that habitat loss and light pollution from urban development are to blame.

Most fireflies need undisturbed natural areas to survive. They overwinter as larvae buried in the soil and hide during the day under bark or stones or in decaying vegetation.  Mud is needed for the pupal stage. Human light pollution is believed to interrupt firefly flash patterns and thus their mating rituals.

If you want to help researchers learn more about this insect, consider participating in a fun citizen scientist project called Firefly Watch. You simply watch fireflies in your own backyard or favorite outdoor location and record those observations online at https://legacy.mos.org/fireflywatch.

The next time you see one of these magical insects, think about how they are more than just funny flashers. They benefit our ecosystem and are also beneficial to humans. Their luciferase has been genetically engineered as an enzyme that helps screen for human tumors, test for blood problems, and detect infections faster. Wow!

Originally Published in Canton Daily Ledger Column on 9-12-2015

Sunday, November 7, 2021

Green Roofs Becoming More Popular

Recently (June 2014) I toured the Illinois Department of Agriculture’s green roof on their administration building at the State Fairgrounds in Springfield. It is an impressive sea of green sedum growing atop a structure of concrete and steel. 

Green roofs are becoming an important part of sustainable urban development. These living roofs provide many benefits, including reducing surface temperature, absorbing rainfall to reduce runoff, and even reducing indoor sound.

The Illinois Department of Agriculture’s green roof was installed in 2010. Here are some statistics they provided about the roof during our tour. 

  • It is 28,800 square feet (2/3 of a football field) and covers about 20 percent of building’s roof.
  • It weighs 28 pound per square foot when fully wet. 
  • It absorbs 480,000 gallons of rainwater annually (equal to 1 ½ football fields one foot deep with water). 
  • The roof contains 15 different species of sedum, a drought tolerant groundcover that grows 1/4 to six inches tall.
  • Plants grow in four inches of soil in trays installed over a watertight membrane layer.

This is the second green roof I’ve toured in recent years. The National Great Rivers Research & Education Center in Alton, IL is an impressive example of construction using green technologies in accordance with LEED (Leadership in Energy and Environmental Design) certification standards. In addition to its many other impressive features, the buildings green living roof collects and stores 100% of all storm water. This roof is comprised of 12 inches of growing media and native prairie grass.

Roof gardens are not for everyone or for every roof. According to the Smart Energy Design Assistance Center at the University of Illinois (www.sedac.org), the first question to ask when considering a green roof is if the roof can accommodate the additional weight. The roof may be designed to hold a heavy snow load, but not a water logged garden.

A factsheet by SEDAC indicates that although green roofs have many benefits, they have long investment payback periods. In other words, it takes a long time to recoup the additional costs of installing this type of roof.

My house will likely need a new roof in the next few years, but I doubt a green roof will work for us. Although I love the idea and energy efficiency it brings, it will not work on my sloped roof.

Originally Published in Canton Daily Ledger Column on 7-26-2014

Hummingbirds

Last Saturday’s (3-30-2002) Gardeners’ Big Day was a great success. The day included great speakers, vendors, lunch, and good conversation among participants. Although all speakers and topics were great, everyone was talking about the hummingbird presentation.

Lois White from Smithfield presented an informative and energetic presentation on attracting hummingbirds to your yard. Lois is a dynamic person with an obvious love of hummingbirds. On Lois’s biography she writes that she has a lifelong interest in these stunning tiny birds. She has had a miniature refuge in her yard for 15 years with up to 25 feeders. Lois has a great love, admiration, and respect for our world’s tiniest birds. Some birds nest in her yard and large numbers stop over a few days on their migration both spring and fall.

Lois provided many helpful hints on how to properly feed and care for hummingbirds. An important area of emphasis was proper feeder care. This is critical. If you want to feed hummingbirds, you must be committed. This includes daily commitment to the feeder’s care or else birds will leave or be killed.

Lois uses a homemade 1:4 mixture: 1 cup sugar to 4 cups water. Bring the water to a rolling boil, add sugar and stir with wooden spoon. Cool and serve. It can be made ahead and stored in the refrigerator.

Never use honey, sugar substitute, or premixes when making your nectar mix. Research says that honey will attract bees as well as a black fungus that will cause a fatal liver and tongue disease in hummingbirds. Also, the use of red food coloring in your solution is both unnecessary and unhealthy for the birds, especially when your feeder already has the appropriate red plastic blossom.

Hummingbird feeders require routine cleaning every 2 to 3 days, especially in warm weather. Check feeders daily to be sure there are no ants, mold, or off-odor solution present. Feeders made of plastic, glass, or ceramic should be washed with a vinegar solution. Use a bottlebrush to clean hardened debris on feeders, and rinse thoroughly with warm water.

Lois attracts her hummingbirds mainly with feeders. You can also attract them with flowers. There is a long list of flowers that are attractive to hummingbirds. Some annuals that you might have success with include geraniums, verbena, dianthus, vinca, morning glories, salvia, and smaller-flowered petunias. They like red colors and fragrant blooms. However, popular flowers for hummingbirds in my yard are sage, fuschia, and impatiens.

Thanks Lois for your great presentation. Hopefully those in attendance will not only attract hummingbirds to their yards, but also do it safely and properly.

Originally Published in Canton Daily Ledger on 3-30-2002

Landscape Waste…Trash or Treasure?

We have all heard that one person’s trash is another’s treasure. That is especially true when it comes to composting garden and yard waste. In fact, many people call finished compost “black gold”.

Composting is the ancient art of mixing by-products from your yard with water, air, and time. What better way to dispose of leaves in the fall, grass clippings throughout the summer, and kitchen vegetable scraps than to turn them into compost?

Composting is a biological process in which microscopic organisms break organic waste into a dark, rich, and crumbly substance called humus. Like other critters, these microscopic organisms need a proper diet made up of a balance of green and brown materials.

Green material might include grass clippings, pulled weeds, vegetable garden waste, rotten fruits, and more. Brown material is often leaves in the fall but can also include dead flowers, shredded newspaper and other dried up plant material.

Basically, composting is like making lasagna. By-products from your yard are layered, alternating green and brown materials. A ratio of 1-part green material to 2-parts brown is a good start. In the beginning, you might also include bare soil or animal manure, which contains microorganisms that get the pile working.

When you are done, water the pile and wait. A properly functioning pile will heat up in the center. Once the pile starts “cooking,” it will break down faster if you turn it regularly with a pitchfork or rototiller. I sometimes leave a small tiller by my compost pile, so it is easy to turn.


Locate your compost pile in an accessible, but inconspicuous area. The average homeowner compost pile size is 3 feet by 3 feet. A compost pile can be as simple as piling materials in a corner of your yard. My compost area includes three bins constructed with discarded pallets from a local store. This allows me to have three stages of compost at once.

For a different twist on composting, try vermiculture. Also called worm composting, vermiculture uses small red worms to compost kitchen waste. I have a small tub of worms in my basement making “black gold.”

For more information on composting for the homeowner go to web.extension.illinois.edu/homecompost.

Originally Published in Canton Daily Ledger on 10-12-2002, 7-23-2005, and 3-3-2012

Friday, November 5, 2021

Birding Equipment…How to Use Binoculars

University of Illinois
Master Naturalist Training
We are enjoying watching the birds at our backyard feeders in the winter. They add action and color to an otherwise static winter scene. 

Bird watching is a popular hobby in America. According to a 2016 US Fish and Wildlife Service survey, more than 45 million people watch birds around their homes and away from home. If you aren’t already, you too can be a birder. All you need is the will and some basic equipment. 

Most people use binoculars to bird. The most common ones that I see are 7 x 35. The first number signifies magnification, and the second number gives the size of the lens in millimeters. A bigger ratio of magnification to lens size gives a sharper image. Therefore an 8 x 42 is sharper than an 8 x 32; however, the 8 x 42 is larger and bulkier to carry.

Regardless of the type of binoculars you have, you need to know how to use them. Binoculars need to be calibrated for each user, using the single adjustable eyepiece knob. Everyone’s eyes are different, so they must be calibrated for your eyes. Once you know your number, it will never change. For my binoculars, I use the 2+ setting, while my husband’s setting is different.

Adjust the binoculars to fit your eye width using the center hinge. If you wear glasses, roll the rubber edge down or twist each eyepiece all the way inward. Those without glasses need that extra space left alone. Finally, rotate the center wheel to focus both eyes on the subject in view.

If you are serious about birding, you might also consider getting a spotting scope. Spotting scopes work from a farther distance away and often require a tripod for stability. Scopes magnify a subject 20x to 80x, compared to the 7x or 8x on most binoculars.

Illinois Audubon outing with scopes
Birders typically carry a notebook to record their findings. Some also use their smartphone or tablet to play bird calls and look up identification characteristics.

One of my favorite birding websites is the Cornell Lab of Ornithology at www.birds.cornell.edu. There you’ll find directions on calibrating your binoculars and downloadable birding checklists for your location. Start building your bird life list today.

Birding from the comfort of your home is a fun winter activity. In 2018 I produced a YouTube video on Bird Feed Types and Tips. I talk about how adding variety to your bird feeders attracts a wider variety of birds. Learn about types of seed and feeders that you can use in your yard.

Originally Published in Canton Daily Ledger on 2-2-2013 and 1-20-2018

Thursday, November 4, 2021

Light Pollution Mars a Starry Night

During our recent trip to Miami to visit our son and daughter-in-law, my husband and I visited the traveling Van Gogh exhibit. It was amazing! Particularly moving was the 360 degree immersion that put us within his paintings where we watched a progression through various paintings and quotes. I also liked the changing flowerpot and his many painted versions of sunflowers. But, it is his starry night paintings that are most popular and meaningful. They reminded me about the following article I wrote in 2012 about light pollution. 

Light Pollution

Ferree Pool at night
Some of my most memorable life moments happen at night when looking at a starry sky. For me those moments happen on camping trips, while boating down the Illinois River, and when I canoed the Canadian boundary waters. They also occur regularly in my own backyard while swimming at night or sitting in one of my favorite gardens. Especially breathtaking and memorable, are the winter skies that I’ve seen from our outdoor hot tub. Fortunately for me, my home is in the country away from any city lights and the light pollution they emit.

What is light pollution? According to the International Dark-Sky Association (IDA), light pollution is defined as “excessive and inappropriate artificial light.” They categorize light pollution into four types. Urban sky glow brightens the night sky over inhabited areas. Light trespass puts light where it is not intended, wanted, or needed. Glare causes excessive brightness which causes visual discomfort. And, clutter refers to bright, confusing, and excessive groupings of light sources. 

Why is light pollution a problem? Most people recognize that they can see more stars in a dark country location than they do in town. Bright night lights are also said to impact wildlife behavior and plant growth. Research done at Purdue University and University of New Orleans found that light pollution directly affects plants’ growth cycles and indirectly affects trees by interfering with the lifecycles of their pollinators.  

What can YOU do to reduce light pollution? The IDA recommends using a strategy that saves money while also reducing the impact of artificial light at night. Shield your outdoor lighting and only use it when needed. Use timers and dimmers and shut off lights when you can. Use only enough light to get the job done. 

I have been interested in outdoor lighting for several years. Last year (2011) my husband Mark and I installed a new wired outdoor lighting system to safely light the main paths in our outdoor rooms with soft, indirect, beautiful light. All of our lights are on timers, including brighter lights at the main entrance to our home. We prefer the more dependable and softer light of a wired system over solar lights.

When entertaining in the summer, we add light with tiki torches and lanterns. In the winter, we add subtle, stringed lights near the high use outdoor areas such as the hot tub and covered gazebo. And, when we want to view the stars while soaking, we turn off the tub lights or use the less harsh red ones. 

I invite you to go outdoors and marvel at a twinkling starry sky. You might find that you agree with Vincent Van Gogh who said this about his famous Starry Night painting, “I often think that the night is more alive and more richly colored than the day.”

Originally Published in the Canton Daily Ledger Column, 11-24-2012